

What Symphonic Orchestrator is
Symphonic Orchestrator starts from a melody: one you play, one you import from a MIDI file, or one it writes itself. From that melody it writes a complete piece. It decides the harmony, shares the voices out among the sections of the orchestra, shapes the piece into sections, and writes the dynamics and expression of every note.
The result plays inside the plugin with the DB Soft sound bank, and you can take it to your DAW in several ways: by dragging it, as multitrack MIDI, as a Reaper project or as WAV audio. Each part goes on its own track, with the keyswitches and curves your libraries need.
- 36 parts: woodwinds, brass, timpani, harp, piano, strings, celesta, organ, choir, twelve percussion instruments, and the guide carrying the melody.
- 23 styles, from a Bach chorale to an epic trailer, by way of jazz, rock and Latin music.
- Formats: a VST3 plugin for your DAW and a standalone application for Windows.
If this is your first time, go to First steps: in five minutes you will have a piece playing. After that, each tab has its own section, in the order the tabs appear in the window. Button and checkbox names are written like this, exactly as they appear on screen.
Installing and first launch
Install
Run the installer and choose its language. It installs these items; all of them except the plugin can be unticked:
- the VST3 plugin, in
C:\Program Files\Common Files\VST3\; - the standalone application;
- the Orchestrator Medidor plugin, used in the Balance tab;
- the Tutti Orchestra sampler.
Then open your DAW and rescan your plugins if it doesn't find the new one by itself. You will find it among the instruments, named "Orchestrator".
Download the sounds
The installer doesn't include the sound bank: it is downloaded once, the first time you open the plugin. In the Orchestrate tab, press Download sounds.
- The download is about 510 MB, and the installation needs about 1.2 GB of free disk space.
- The download goes on even if you close the plugin window, and the bank loads by itself when it finishes.
- It is installed in
%LOCALAPPDATA%\Tutti\Bancos\DB Soft Orquesta. The three DB Soft plugins share this folder: if you have already downloaded it with Tutti or NovelaSonora, you don't need to do it again.
The bank is DB Soft Orquesta: 65 instruments recorded by Versilian Studios and released into the public domain (CC0). You can use it in commercial music without asking anyone. If the download fails, the message tells you why (no connection, no disk space, an interrupted or damaged download); press the button again. Once the bank is installed, the button reads Download sounds again: use it to repair the installation or to get a new version.
Language
The selector in the top right corner offers Language: automatic, Idioma: Español and Language: English. In automatic mode the plugin is in Spanish if Windows is in Spanish, and in English otherwise. The change applies when you close and reopen the window; in the standalone application, when you restart it. Whatever you save (projects, recipes, sessions) doesn't depend on the language.
The window
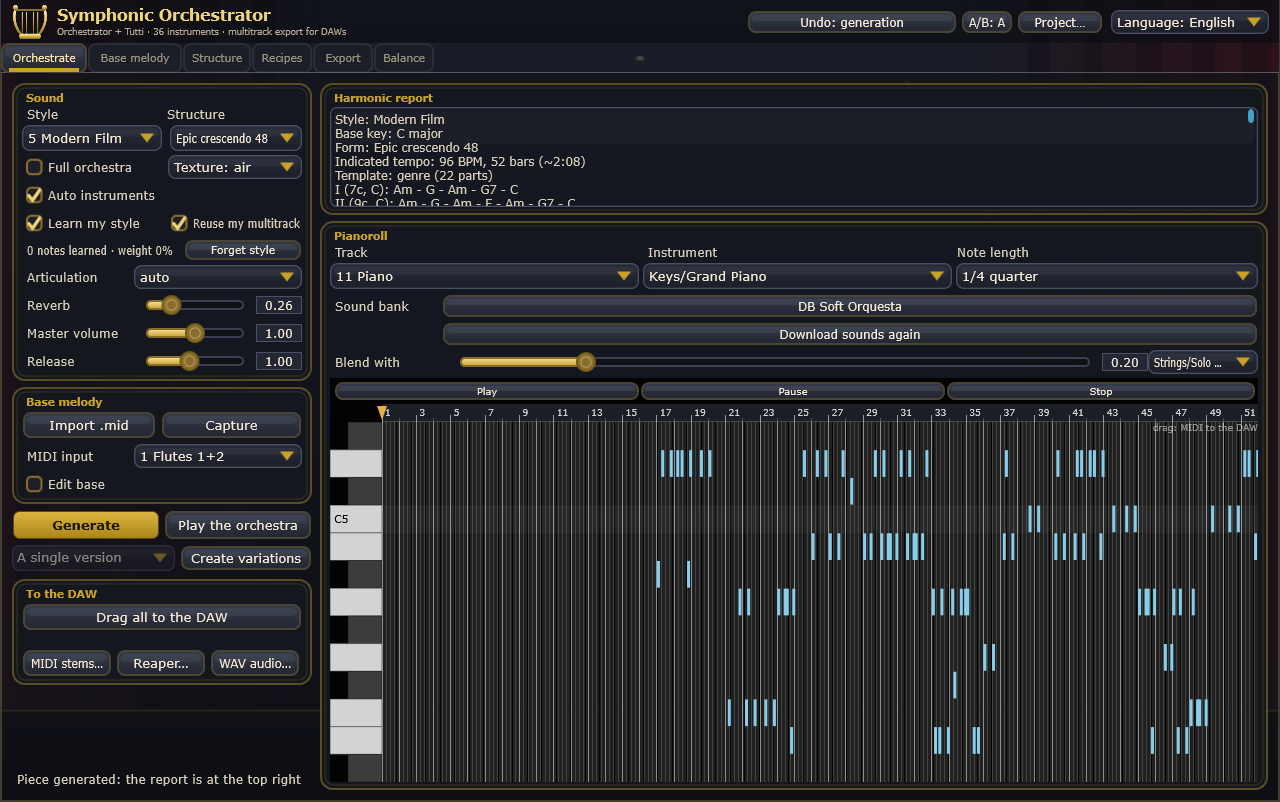
The header at the top is shared by all the tabs. Below it are the six tabs: Orchestrate, Base melody, Structure, Recipes, Export and Balance.
The header
- Undo: the button says what it will undo ("Undo: meter", "Undo: instrument"). It keeps up to 16 steps. Consecutive gestures of the same kind count as one: lengthening a section with "+" twenty times is undone in one go. You can undo generating, importing, capturing, the structure, loading a recipe, the instruments, and nearly everything in Export and Balance. The reverb, volume and release sliders can't be undone, and neither can saving, renaming or deleting recipes.
- A/B: compares the current piece with the previous generation. It becomes available the second time you generate, and switches between "A/B: A" (the previous one) and "A/B: B" (the current one) without losing either.
- Project…: a menu with Save project…, Load project… and License…. A project (
.orchproj) holds the piece, the base melody, the structure and the settings. In a DAW you don't need to save it separately: all of this travels inside the session. - The language selector, described above.
Without a license, a demo mode strip appears under the header.
Drop a .mid file anywhere on the window and it is imported as the base melody, just like Import .mid.
First steps: your first piece
- Get a melody. The quickest way is to go to Base melody and press Generate base. You can also play one in (Capture) or import one (Import .mid) in the Orchestrate tab. Four notes are enough, though it works better with four bars or more, in a single line.
- Choose a style. In Orchestrate, under Style, try "5 Modern Film" or "3 Late Romantic". The structure follows the style.
- Press Generate. A few seconds later you have the whole piece. The harmonic report, top right, tells you what it did.
- Listen with Play the orchestra. To stop, use Stop above the pianoroll.
- Refine it. If you don't like it, press Generate again and compare with A/B. Or press Create variations to get four versions and keep the best.
- Take it to your DAW. Press Drag all to the DAW and, without letting go of the mouse button, drag it onto your DAW's arrangement. This needs the license.
The Orchestrate tab
This is the main tab. The controls are on the left, top to bottom in the order you use them, and the report and pianoroll are on the right. A status line at the bottom left says what just happened.
Sound
- Style: the 23 styles (full list in the appendix). Each brings its own harmony, instrument template, tempo range and way of sharing out the voices. Changing it also suggests the matching structure.
- Structure: the form of the piece. There are seven (ABA' Miniature, Sonata, Rondo, Theme and variations, Fugue, Epic crescendo and Minimalist additive). To edit it section by section, use the Structure tab.
- Full orchestra: when ticked, the MIDI carries all 36 parts, including the empty ones. This is handy with a DAW template that has every track set up. When unticked, only the parts of the style's ensemble are included.
- Texture: auto picks the best one; air thins out the accompaniment; balanced removes doublings; tutti keeps everything.
- Auto instruments: when generating, picks the bank instrument for each track by its role, the style and the texture. Untick it if you have chosen instruments by hand: while it is ticked, every "Generate" picks them again.
- Learn my style: the plugin learns the intervals and rhythm of the melodies you capture or import (from the top line) and uses them when composing. Underneath you see how many notes it has learned and their weight. Forget style clears them.
- Reuse my multitrack: when you import a multitrack MIDI file, the tracks that aren't the melody are kept as your own material. When generating, up to seven of them are placed in free parts, moved into each instrument's register.
- Articulation: for the track selected in the pianoroll (auto, normal, staccato, legato, tremolo, vibrato, portamento, marcato). It only changes the sound inside the plugin.
- Reverb, Master volume and Release: the mix of the internal sound. Release lengthens or shortens the note tails.
Base melody
- Import .mid: reads a MIDI file. The track with the most notes becomes the melody; where it has chords, the top note of each attack is kept. The tonic and the scale are worked out from it.
- Capture: records what you play on your MIDI keyboard. The button changes to Stop (4+ bars); press it again to finish. Capture runs on its own clock at 120 BPM, not the DAW's tempo. Starting a capture replaces the previous base (this can be undone).
- MIDI input: the part that plays when you play from the DAW or keyboard. All incoming MIDI goes to this part, whatever its channel.
- Edit base: switches the pianoroll to the base melody (in green) so you can edit it note by note.
Composing
- Generate: writes the whole piece. It needs at least four notes of melody.
- Play the orchestra: plays every track, with its expression, from the pianoroll's playhead.
- Create variations: generates four versions and activates the best-scoring one. The selector next to it lists them with their quality ("Variation 2 (78%)"). Each keeps its own edits when you switch between them.
To the DAW
The four ways to get the piece out are described in Taking the piece to your DAW. All of them need the license.
Harmonic report
Top right. It sums up the style, key, form, tempo and length. Then it gives the key and chords of each section, the development plan for the melody, and the orchestral quality by criterion (clarity, density, register, polyphony…). At the end come the warnings: a part out of range, a very dense texture, which of your own material was used…
The pianoroll
- Track: the part on view (one of the 36). Instrument: the bank instrument it plays with. Note length: the length of new notes in "Edit base".
- Sound bank: the button carries the name of the loaded bank. Press it to load another
.sf2or.sfz; if you pick a.sfz, its whole folder is loaded. Download sounds is underneath. - Blend with: blends the track's instrument with a second sound from the bank. Choose the sound on the right and the amount with the slider.
- Play, Pause and Stop: play what is on view, from the playhead. Stop cuts everything, including notes coming from the DAW.
| Gesture | What it does |
|---|---|
| Click on the bar ruler | Moves the playhead to that beat. |
| Mouse wheel | Scrolls through the octaves. |
| Ctrl + wheel | Horizontal zoom. |
| Shift + wheel | Scrolls horizontally. |
| Dragging vertically over the keyboard | Changes the key height (vertical zoom). |
| Click on a note | Selects it and plays it. |
| Dragging out of the pianoroll | Takes that single track to the DAW, or the base melody if you are in "Edit base". |
| Click on an empty spot (in "Edit base") | Creates a note of the chosen length. |
| Dragging a note's right edge | Changes its length. |
| Right-click or Alt + click | Deletes the note. |
| ↑ ↓ | Moves the note a semitone (with Shift, an octave). |
| ← → | Moves the note a sixteenth (with Shift, a bar). |
The Base melody tab
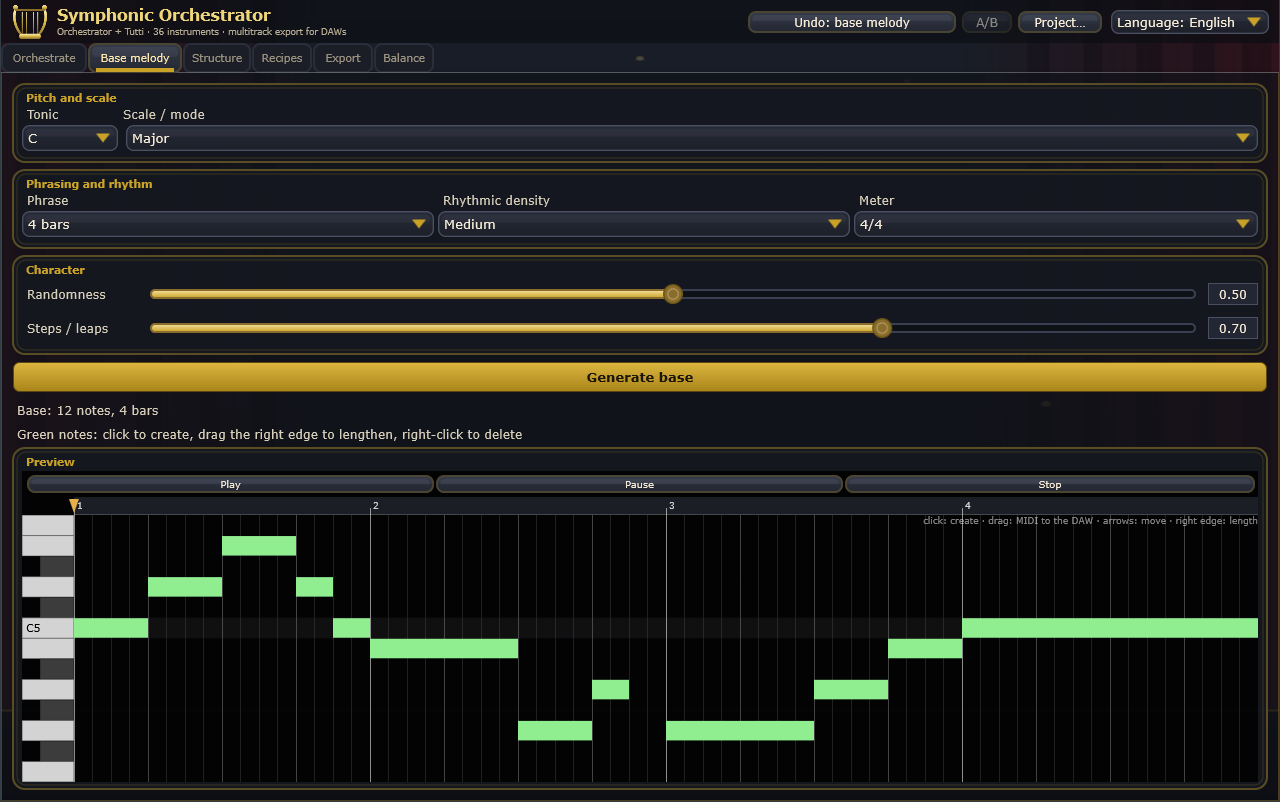
This tab writes the starting idea. It combines a Markov chain over the scale degrees with two neural networks, one for intervals and one for rhythm, trained on statistics from real music. It keeps the best of twelve candidates, and takes into account the style chosen in Orchestrate.
- Tonic and Scale / mode: thirteen scales (major, natural, harmonic and melodic minor, the pentatonics, Dorian, Mixolydian, Lydian, Phrygian, blues, whole tone and octatonic).
- Phrase: 2, 4 or 8 bars. Rhythmic density: sparse, medium or dense. Meter: from 2/4 to 12/8. It is also the meter of the piece in any section where the meter is set to "auto".
- Randomness: from 0 (always the same melody) to 1 (as varied as possible). Steps / leaps: from 0 (lots of leaps) to 1 (almost all stepwise).
- Generate base: replaces the base melody with a new one. This can be undone.
- Preview: the melody in green, to listen to and edit with the same gestures as the Orchestrate pianoroll.
The base melody is the same here and in "Edit base" on the Orchestrate tab: whatever you change in one shows in the other.
The Structure tab
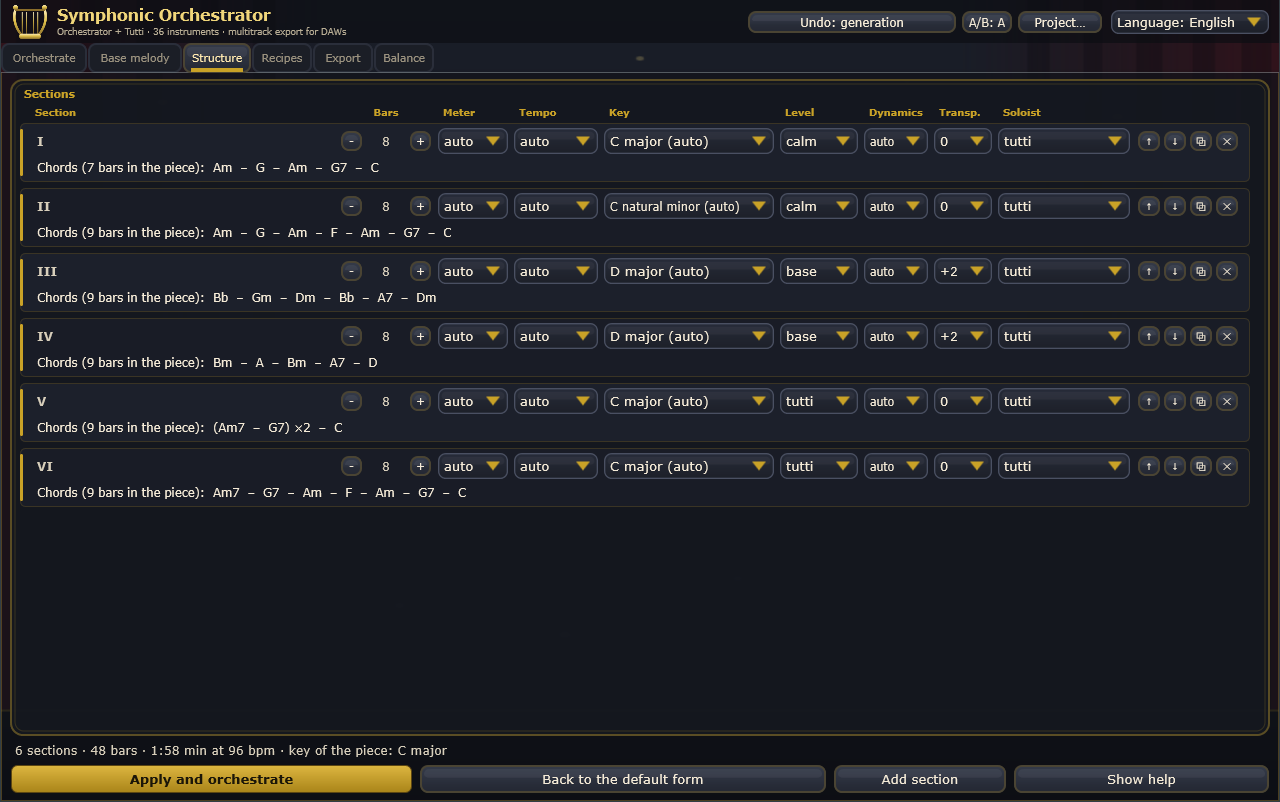
The piece is divided into sections. For each one you set how long it lasts, its tempo and meter, its key, how full it sounds and who carries the solo. Under each section you see the chords it played in the last piece. If a chord cycle repeats, it is written once with the number of times it plays, for example "(Am – G – C) ×2".
| Column | What it does |
|---|---|
| Section | The name. Double-click to rename it. It shows in the report and in the DAW map. |
| Bars | From 1 to 64, with - and +. Moves the start of the following sections. |
| Meter | From 2/4 to 12/8, or auto (the piece's meter). The melody is regrouped in that meter: a 7/8 is grouped in seven, not stretched. |
| Tempo | From 50 to 180 bpm, or auto: an arc that starts at the style's tempo, grows and relaxes in the last section, like a ritardando. |
| Key | The piece's key, moved by the transposition. You choose the mode: the piece's, the parallel one (major or minor), or auto, which puts the contrasting section in the parallel mode. |
| Level | calm (low strings and guide), base (adds woodwinds) or tutti (brass and percussion). Instruments really come in and drop out; it isn't just a volume change. |
| Dynamics | From pp to ff, or auto, which follows the arc of the form. |
| Transp. | Semitones above or below the piece's key, from -12 to +12 in steps of two. On export, the key signature change lands on the exact tick where the section starts. |
| Soloist | tutti, or one instrument that carries the section alone (the guide keeps playing). |
| ↑ ↓ ⧉ ✕ | Move the section up or down, duplicate it, delete it. At least one section always remains. |
A line under the table sums up the number of sections, the bars, the estimated length and the key of the piece. At the bottom are the buttons:
- Apply and orchestrate: switches your structure on and generates the piece with it. With the structure applied, the piece uses exactly your bars, tempos and key signatures.
- Back to the default form: throws away your edits and brings back the style's structure.
- Add section: adds an eight-bar section at the end.
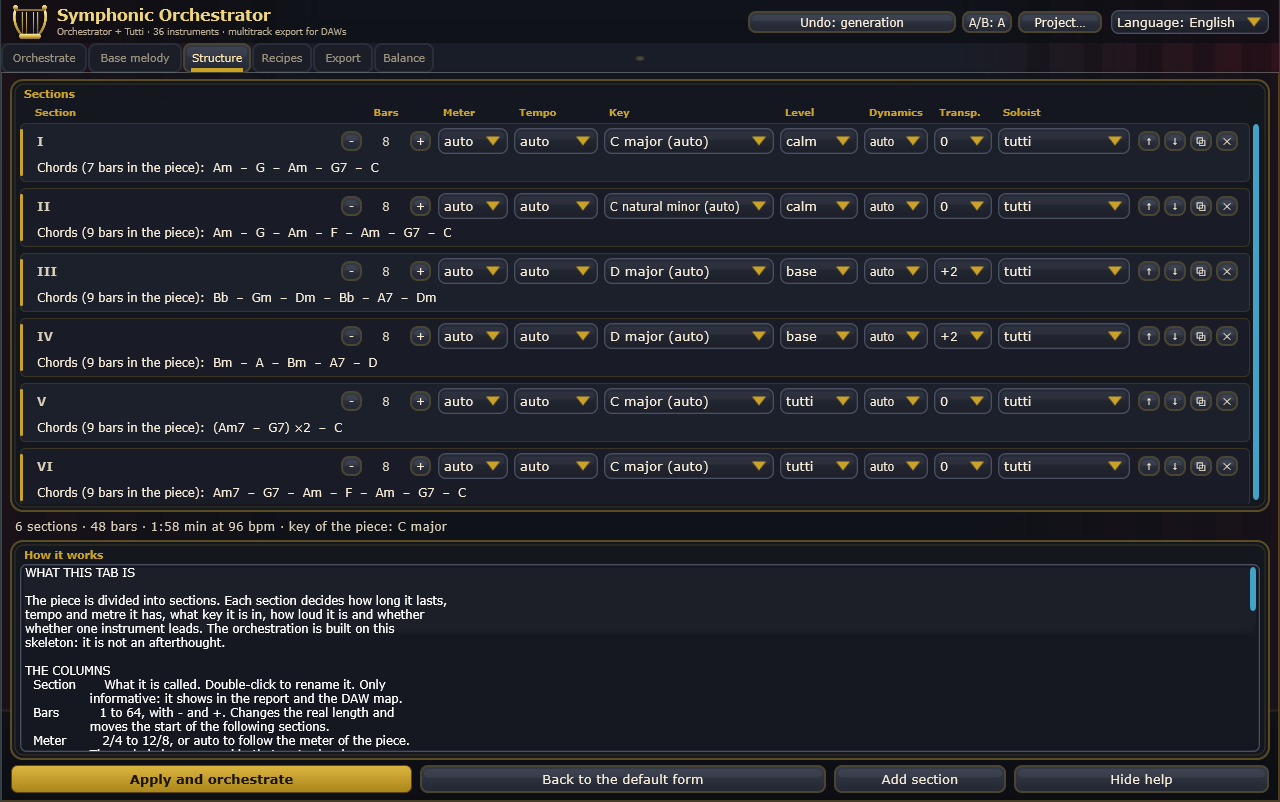
- Show help: opens the "How it works" panel, which explains every column.
Without "Apply", the piece adjusts the default form's bar counts to your melody and the style. That is why the chord line may say, for example, "Chords (11 bars in the piece)" while the table says 8. While a structure is applied, changing "Structure" on the Orchestrate tab doesn't change what is generated: to go back to the style's forms, press Back to the default form.
The Recipes tab
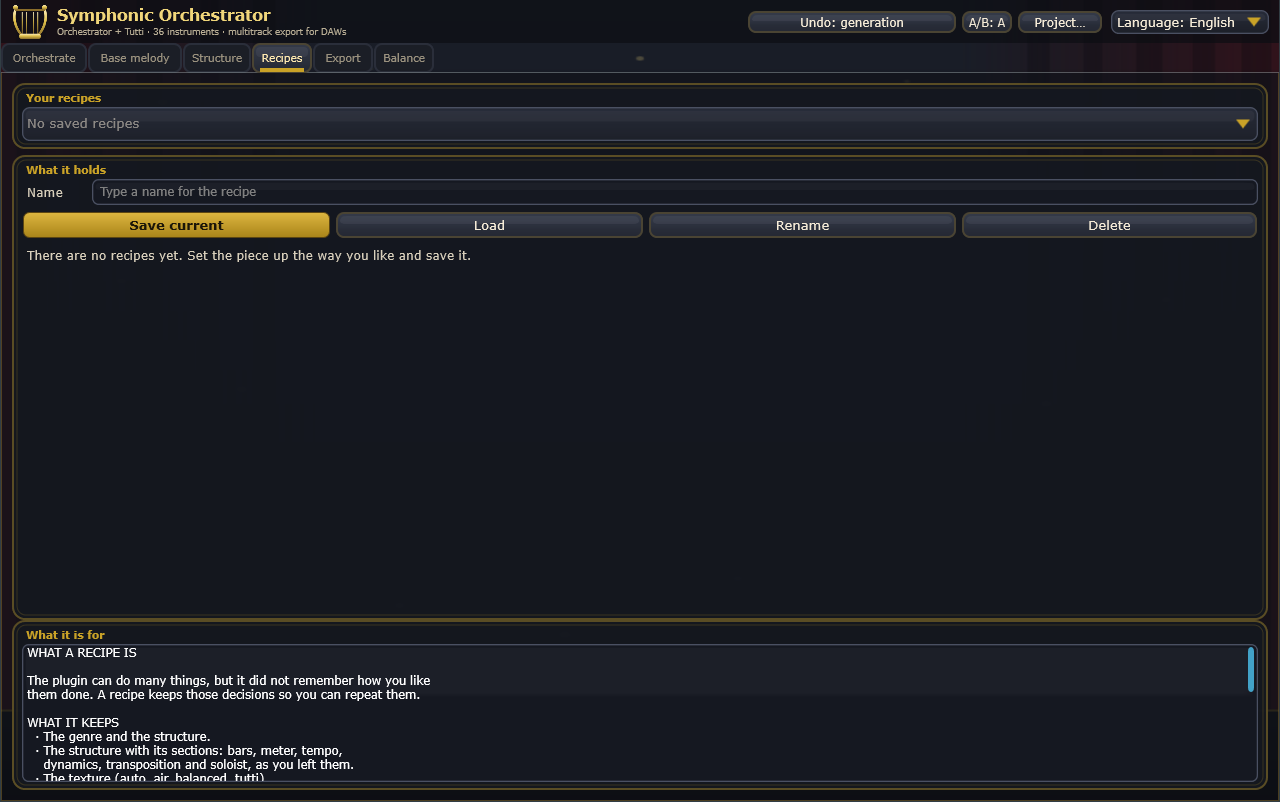
A recipe saves the way you like to orchestrate, so you can repeat it in your next piece:
- the style and the structure, with its sections as you left them;
- the texture, and whether you use the full orchestra;
- each part's instrument, blend, articulation and volume;
- the reverb, master volume and global articulation.
It doesn't save the notes or the base melody, which are what change from one piece to the next.
- When a piece sounds the way you want, type a name in Name and press Save current. If the name already exists, that recipe is replaced.
- In your next piece, choose the recipe in Your recipes, press Load and then Generate.
Rename and Delete do what they say. Loading a recipe can be undone. Recipes are stored on your computer, not inside the project: opening a session doesn't change your list. Each instrument is also stored by name, so a recipe still works if you change banks.
The Export tab
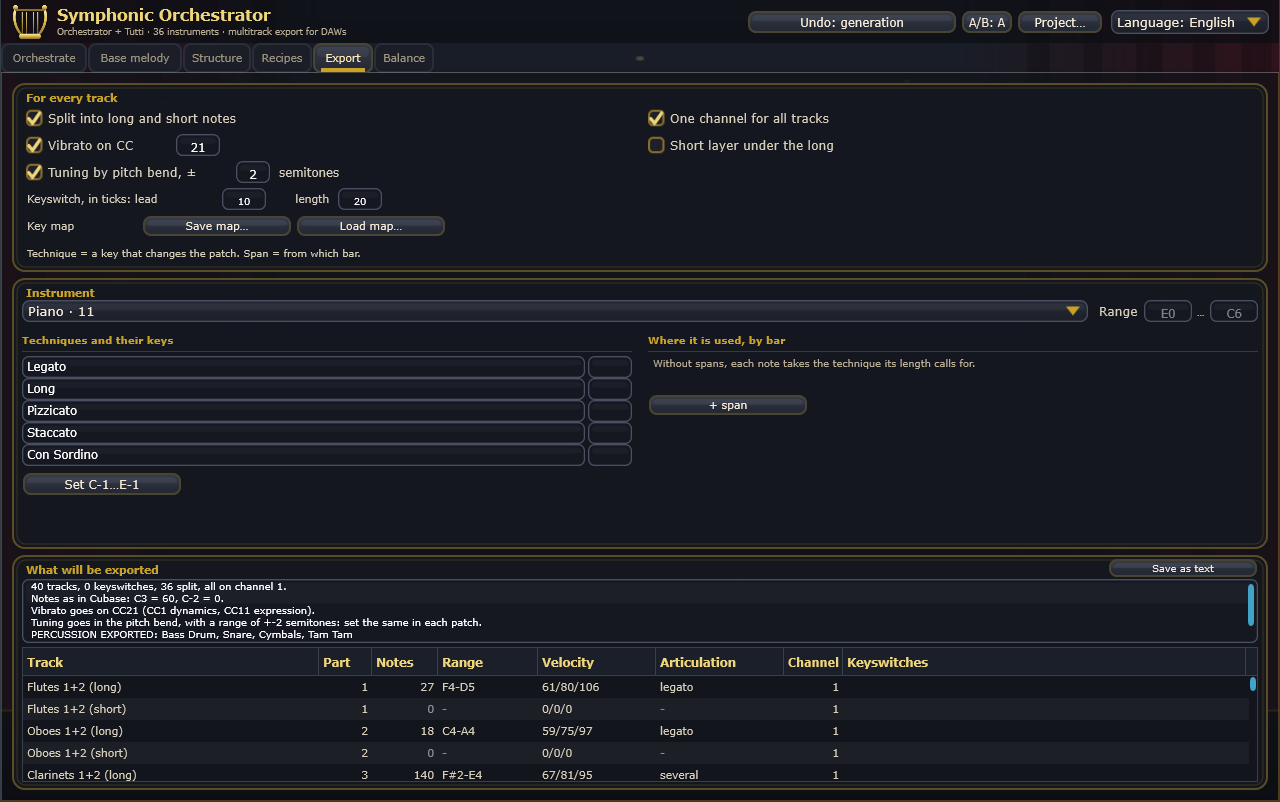
Nothing in this tab changes what you hear inside the plugin. It only changes how the MIDI is written for your DAW's libraries (Kontakt, Spitfire, Cinematic Studio…). It applies when you drag the piece or a single track, and to MIDI stems… and Reaper….
For every track
- Split into long and short notes: each part comes out on two tracks, "(long)" and "(short)", so you can load the right patch on each. Percussion isn't split.
- One channel for all tracks: everything on channel 1. In a DAW each track is already a track: the channel doesn't route anything.
- Vibrato on CC: exports the vibrato curve on that controller. CC21 is the one Spitfire and Cinematic Studio use; change it if your library uses another.
- Short layer under the long: adds a "(layer)" track with short, soft notes on the attacks that call for one, so you can load a spiccato or staccato patch there. It gives definition to the legato.
- Tuning by pitch bend, ±: exports each note's small natural detuning. The range must match your patch's, which is nearly always ±2.
- Keyswitch, in ticks: lead and length: how many ticks ahead of the note the keyswitch goes, and how long it lasts. At 120 BPM you usually need a lead of 30 to 40 ticks.
- Key map: Save map… and Load map… write the keyswitches, percussion notes and ranges to a text file, so you can carry them from one piece to another.
Instrument
Choose one of the 36 parts to adjust it.
- Range: the notes that instrument accepts in your library, written as in Cubase (C3 = 60). Anything outside the range is moved to an octave that fits.
- Techniques and their keys: the key that switches each technique (Legato, Long, Pizzicato, Staccato, Con Sordino) in your library. Set C-1…E-1 fills in the most common map.
- Where it is used, by bar: the spans. From a given bar onwards, a technique plays. Without spans, each note takes the technique its length calls for. Pizzicato and Con Sordino only come in through a span. + span adds one.
- For the percussion parts, instead of techniques there are strokes (plain, accented, muted, rim, roll), each with the note that triggers it in your library.
What will be exported
A summary and a table with each track: notes, range, velocities, articulation, channel and keyswitches. Tracks with a warning carry a "!", and the warning appears when you hover over it. Save as text saves this guide as Documents\bounce.txt.
The Balance tab and the Medidor
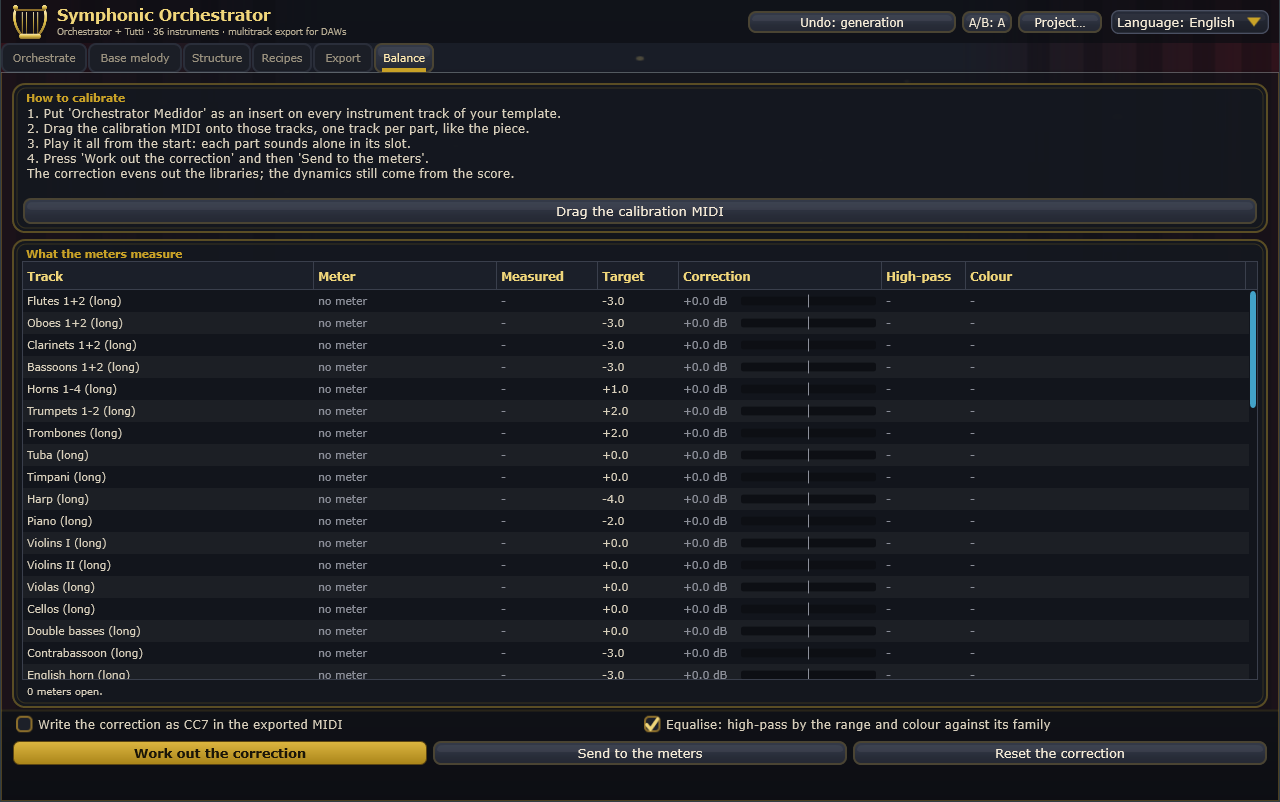
Every library is recorded at its own level: one brand's violin can sound twice as loud as another brand's flute. This tab measures the loudness of each patch in your template, just once, and corrects it with a fixed gain. The dynamics still come from the score.
- In your DAW, put the Orchestrator Medidor plugin as an insert on every instrument track, with Part: automatic (from the calibration).
- In Balance, drag Drag the calibration MIDI onto those tracks, one track per part, as you would with the piece.
- Play it all from the start (about two and a half minutes). Each part sounds alone in its slot. Each meter recognises its part from the gap between two sync hits, so the project tempo doesn't matter.
- Press Work out the correction and then Send to the meters.
Each meter applies its correction and saves it in the DAW project, so it keeps working even when the main plugin isn't loaded. The table shows the state of each one: waiting, synced, measuring or measured (in red if it hears music that isn't the calibration).
- Write the correction as CC7 in the exported MIDI: an alternative without meters. It writes a CC7 at the start of each track, but it can only raise a track by up to 4 dB.
- Equalise: besides the gain, each meter applies a gentle high-pass below the instrument's range, and a body-and-brightness touch that matches it to its section.
- Reset the correction: starts over. To clear the correction from the meters too, press Send to the meters afterwards.
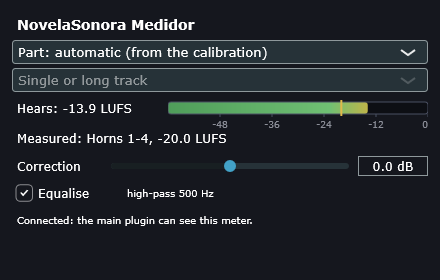
If you switch "Split" or "Layer" on or off, the tracks change: drag the calibration MIDI again and put a meter on each new track.
Taking the piece to your DAW
All four ways are in the To the DAW box on the Orchestrate tab. They all use the Export tab settings, and they all need the license.
- Drag all to the DAW: press and drag onto the arrangement without letting go. You get a MIDI file with one track per part and a tempo track with the tempo, meter and key signature changes. You can also drag a single track out of the pianoroll.
- MIDI stems…: saves the piece as one multitrack MIDI file wherever you choose.
- Reaper…: next to
Documents\Orquestador\orquesta.mid, writes a Reaper script (orchestra_reaper.lua), a track map (daw_map.csv) and a README with the steps for Reaper, Cubase and Logic. - WAV audio…: saves the piece as it sounds in the plugin, reverb included, as a WAV file.
The Reaper script creates and names the tracks, but first it deletes every track in the open project. Run it in an empty project: Actions › Show action list › ReaScript › orchestra_reaper.lua.
In Cubase
- Notes are named as in Cubase: C3 = 60.
- Cubase drops the tempo changes when you drag a MIDI file into an open project if Preferences › MIDI › MIDI File › Ignore Master Track Events on Merge is ticked (it is by default). Untick it, or import into a new project with File › Import › MIDI File.
- The MIDI file starts with a tempo track without notes, because Cubase treats the first track as the tempo track.
License and demo mode
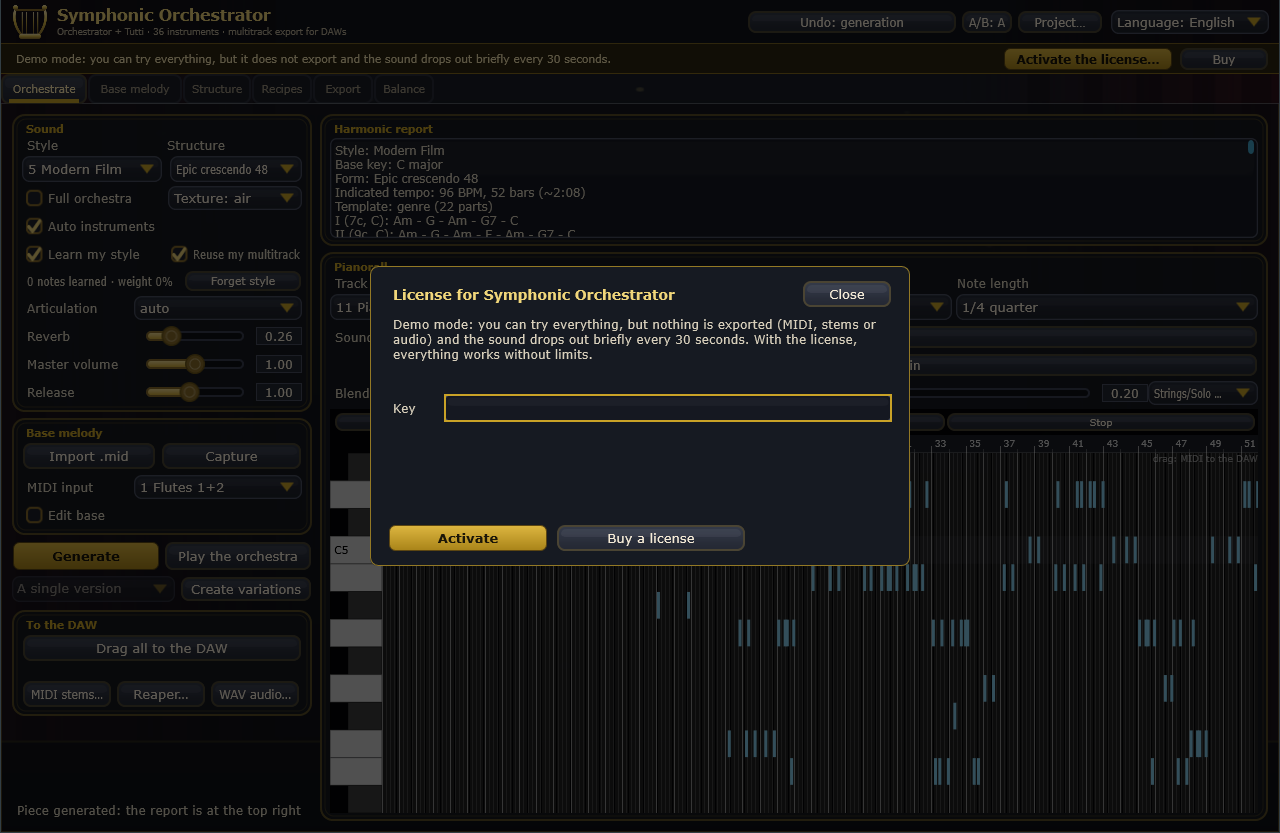
Without a license, the plugin runs in demo mode. You can compose, generate, listen, edit, and save projects and recipes, but:
- the piece isn't exported: no dragging to the DAW, no stems, no Reaper, no WAV;
- the sound drops out for a couple of seconds every 30 seconds.
You can still drag out the base melody and the calibration MIDI.
To activate, press Activate the license… on the strip (or Project… › License…). Paste the key from your purchase email into Key and press Activate. Activation needs an internet connection. After that, the license checks itself every few days and keeps working for 30 days offline.
With the license active, the panel shows who it is registered to and how many computers use it. Release this computer removes it from this machine so you can activate it on another.
Where things are stored
| What | Where |
|---|---|
| Exports (MIDI, Reaper, calibration) | Documents\Orquestador |
| The sound bank | %LOCALAPPDATA%\Tutti\Bancos (shared with Tutti and NovelaSonora) |
| Recipes and language | In your user data folder, %APPDATA%\Orchestrator |
| The export guide | Documents\bounce.txt |
| The piece, base and structure | Inside the DAW session, or in the .orchproj you save |
Questions and common problems
Nothing plays
Check that the Sound bank button shows a bank name. If there is none, press Download sounds. In the standalone application, check in Options that the audio output is the right one.
"Generate" says "Not enough notes (4 at least)"
The base melody has fewer than four notes. Generate one in Base melody, capture one, or import a MIDI file.
I chose instruments and they changed when I generated
Untick Auto instruments: while it is ticked, every generation picks them again.
Cubase ignores the tempo changes
See In Cubase: there is a preference that drops them on merge.
Dragging opens the license panel
Exporting the piece needs the license. Until you activate it, the plugin runs in demo mode.
My DAW libraries sound uneven
That is what the Balance tab and the Medidor are for.
Appendix: styles, structures and parts
The 23 styles
1 Bach Chorale · 2 Viennese Classical · 3 Late Romantic · 4 Impressionist · 5 Modern Film · 6 Baroque Fugue · 7 Neoclassical · 8 Minimalist · 9 Epic Trailer · 10 March · 11 Nocturne · 12 Scherzo · 13 Chamber · 14 String quartet · 15 Solo · 16 Rock band · 17 Pop band · 18 Jazz band · 19 Blues · 20 Folk · 21 Funk · 22 Latin music · 23 Marching band.
The seven structures
| Structure | Sections |
|---|---|
| ABA' Miniature 32 | A, B, A', Coda |
| Sonata 56 | Exposition A and B, Development I and II, Recapitulation, Coda, Apotheosis |
| Rondo 48 | A, B, A, C, A, Coda |
| Theme and variations 40 | Theme, V1, V2, V3, Coda |
| Fugue 40 | Exposition, Episode I and II, Stretto, Coda |
| Epic crescendo 48 | I to VI, building up (Modern Film's structure) |
| Minimalist additive 48 | Cell 1 to 4, Tutti, Coda |
The 36 parts
Flutes 1+2, Oboes 1+2, Clarinets 1+2, Bassoons 1+2, Horns 1-4, Trumpets 1-2, Trombones, Tuba, Timpani, Harp, Piano, Violins I, Violins II, Violas, Cellos, Double basses, Melody guide, Contrabassoon, English horn, Piccolo, Bass clarinet, Celesta, Organ, Mixed choir, and twelve percussion parts: bass drum, snare, two toms, closed and open hi-hat, crash, ride, cymbals, clash cymbals, triangle and tam-tam.
The orchestral styles use bass drum, snare, cymbals, clash cymbals, triangle and tam-tam. The band styles (rock, pop, jazz, blues, folk, funk and Latin) use the drum kit: bass drum, snare, hi-hats, crash, ride and toms.